Getting started
Here you will find guides for the basic operation of Reptile Scan. We recommend following the guides in order.
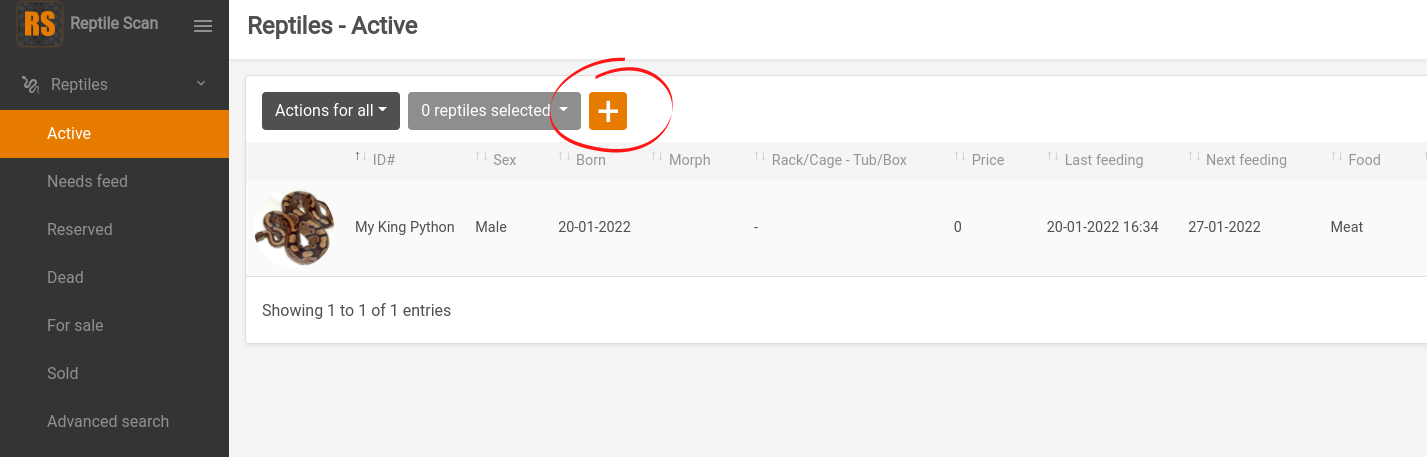
Step 1: Open the web console
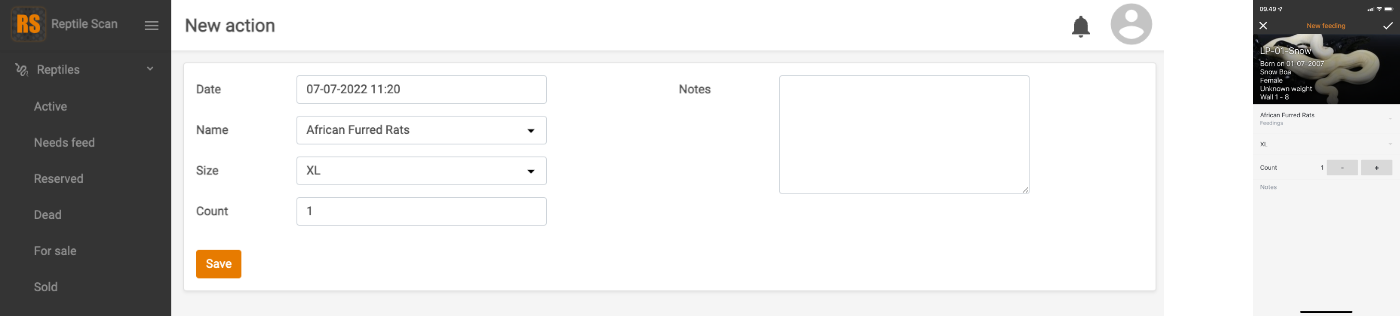
Adding reptiles cannot be done from the app, so open the web console. You should now see the list of active reptiles. Click the orange button to add a reptile.
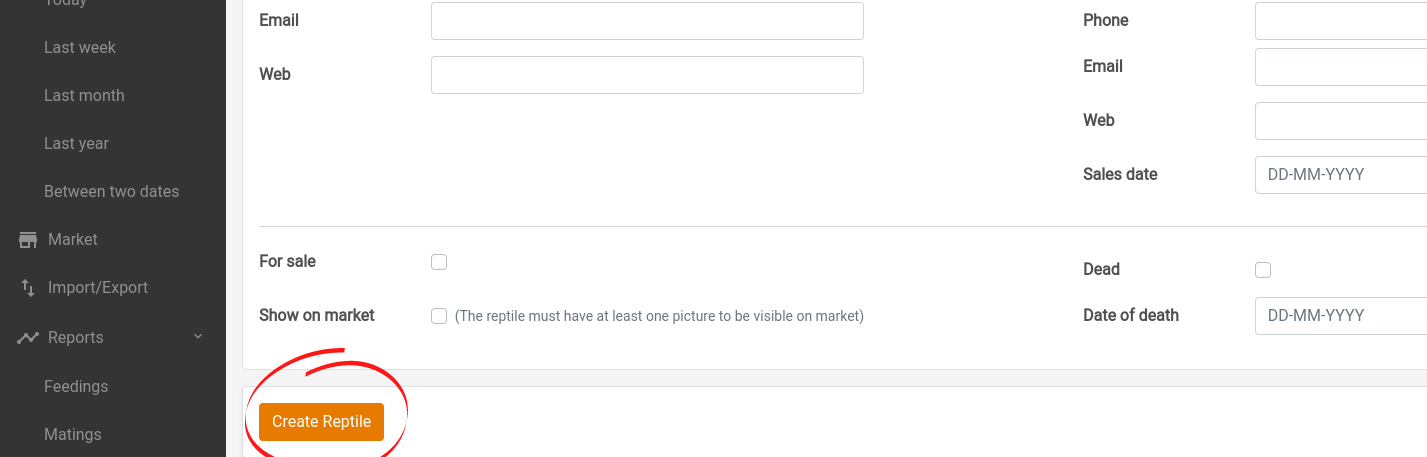
Step 2: Enter data
The system asks for important information about the reptile to be registered, such as: age, sex, weight, food etc. Only the reptile name is required to fill out, although we recommend you fill in as much information as you can. Especially the feeding interval, because if this is 0, your reptile will always appear hungry. You can find a list of all fields in the apendix further down in this guide.
After entering the data, you can save the animal in the system by clicking on the “Create Reptile” button at the bottom of the page.
Step 3: View your newly created reptile
After having created your first reptile, you will automatically be redirected to the "Reptile details" page for the reptile.
This page will consist of following sections:
- General information about the reptile
- Actions
- Actions/Events
- Clutches
- Images
- Growth charts Pro feature
General information about the reptile
General information about the reptile we supplied while creating the reptile.
Actions
The Actions section contains several features to manage your reptiles. The features are detailed below:
- Edit
- Opens the edit reptile page, similar to when creating the reptile.
- Clone
- This opens the add reptile menu, with all information cloned from the selected reptile. This does not include actions and pictures.
- Download as PDF
- Creates a PDF file for download with all information and actions on the reptile.
- Export
- This creates a file, containing all information and actions, which can be imported by another user, through the Import/Export menu. This means you can send a buyer all information regarding the reptile.
- QR code (Normal)
- Creates a PDF file with a normal sized QR code (55x20mm) and general information for the reptile.
- QR code (Large)
- Creates a PDF file with a large sized QR code (85x55mm) and general information for the reptile.
- Expo label
- Creates a PDF file containing an EXPO label, with general information and sales relevant information, such as CITES appendix, for the reptile.
- Sales card
- Creates a PDF file containing a sales card, with general information regarding the reptile, and your contact information. This should follow the reptile when sold.
Actions/Events
The actions/events section sorts all your actions into several expandable rows. For each row you have the option to expand, and show all actions of its kind, or register a new action. The registration page varies depending on the type of action, but the form is generally the same.
The form consist of the following:
- Date
- This prompts the interactive calendar - pick the appropriate date of the action.
- Name
- Pick the action from the dropdown menu.
Then follows a variety of additional fields depending on the action.
Clutches
The clutches field shows any clutches the reptile has either laid or sired.
Clicking the info button of the clutch will open the clutch detail page.
You can edit or delete the clutches through the Clutches menu
Images
The image field lets you switch between profile images or delete images of the reptile. The profile image is displayed on sales cards, as well as reptile lists and detail pages in the web console and the app.
You can upload images of the reptile through the edit reptile menu or add/take images in the app.
Growth charts Pro feature
The statistics field provides charts outlining the growth of the reptile using your actions.
There are 3 charts; weight, length and feedings.
Appendix: Fields explained
The input fields are explained below. All but the name are optional.
- Name (#ID)
- The identifier or name of the reptile.
- Reptile category Pro feature
- Choose a category for this reptile. A category can be used for filtering, and it can define a default value for due date. Categories are defined in the settings menu.
- Sex
- The sex of the animal - Male, Female, or Unknown.
- Species name
- The species of reptile, e.g. Pythonidae or Agamidae.
- Scientific name
- The scientific name of the reptile, e.g. Python regius or Morelia spilota spilota.
- Common name
- The common name for the reptile, for the above examples that would be Ball python or Diamond python.
- Born
- The date the reptile was born or hatched.
- Morph
- The morphology of reptile. This could be morphs such as pastel, piebald or localities as biak or wamena.
- Venomous
- Mark if the reptile is venomous.
- Weight
- The weight of the reptile. The weight is registered as a numerical number without units. This means you can enter values in whichever unit you prefer (pound, stone, kilogram, gram, etc.) as long as you always use the same unit when registering the weight of a reptile.
- Weight progress
- This allows you to set the reptile as either losing weight (Minus weight) or gaining weight (Plus weight).
- Origin
- Country/area of origin for the species.
- Food
- Details of the feeding habits of the reptile can be detailed here. This does not limit your options when tracking a feed on the app or website.
- Feeding type
- Pick a preferred feeding type from the dropdown menu, or type it in the food option above.
- Adult size
- This is the estimated length of an adult reptile of the species.
- Habitat
- Type in the natural habitat of the reptile, such as desert or rainforest.
- Breeder
- Name of breeder of the reptile.
- Breeder email
- The breeder's email, for later reference.
- WC/CB
- Tick either WC (wild caught) or CB (captive bred).
- CITES
- Fill in which CITES appendix the reptile belong to.
- Clutch ID
- Your own or the breeder's ID for the clutch.
- Price
- The sales price of the reptile. This only registers numerical values.
- Nicknames
- Fill in any nicknames you may have for the reptile.
- License number
- The reptile license number.
- Chip number
- If your reptile is chipped, fill in the chip number here.
- Species number
- If you have a number system applied for your species, fill it in here.
- Father
- The dropdown menu contains your reptiles, choose the father from the list, or manually fill in the field below the dropdown.
- Father photo
- Upload a photo of the father.
- Mother
- The dropdown menu contains your reptiles, choose the mother from the list, or manually fill in the field below the dropdown.
- Mother photo
- Upload a photo of the mother.
- Rack
- If you have created the rack or cage in the Racks/cage menu, you can choose it in this dropdown menu.
- Feeding interval
- How often the reptile should be fed. If the interval is exceeded, the reptile will appear on the "Needs Feed" list on the app and the sorted reptile list.
- Due date period
- Fill in the expected period (in days) from the reptile lays a clutch until it should hatch. Users with the Professional plan can leave this blank if they have set a Clutch Due Date Period through the clutches section of the settings menu or by selecting a category for the reptile as explained above.
- Brumation period Pro feature
- Number of days the reptile is in brumation (when adding a brumation event, the reptile will not be marked as hungry for this period).
- Tube/Box No
- If you have a numbered rack system, fill in the number of the box here.
- Note
- Type in any note you have about the reptile.
- Sales card comment
- This is for typing any information you want on the sales card, such as "Aggressive" or "Bad shedder".
- Images
- Upload images of the reptile. Mark the star on the image you wish to use as the primary profile image of the reptile. If none have been marked, the first image will be used.
- Reserved
- Mark a reptile as reserved and add information regarding the potential buyer when editing the reptile.
- For sale
- Marking a reptile for sale will add a "$" to the name in the reptile list, to indicate it is for sale.
- Show on market
- This will cause the reptile to show on the Reptile Scan market.
- Sold
- Remove the reptile from the active reptile list. Setting this option does not remove the reptile from the market, one of the two above options must be set to No.
- Dead
- This has the same effect as the Sold option, except it is a different search and sorting category on the reptile list.
Some features of Reptile Scan are much easier done using the app instead of the web console. Although you can do everything in the web console, and only some things in the app, the app is easier to use when registering actions like feeding and cleaning, because you can bríng it with you and use its scanner functionality.
Step 1: Download and install
Search for Reptile Scan in App Store or Google Play, depending on whether you have an iPhone or Android device.
You can also use these links:
![]()
Step 2: Log in
Use the same email and password as in the web console. If you have not yet created a user, you can create one using the app or the web console.
Please note: You must add your reptiles using the web console before you can use the app for anything, because you cannot add reptiles in the app. The app is for quickly registering actions.
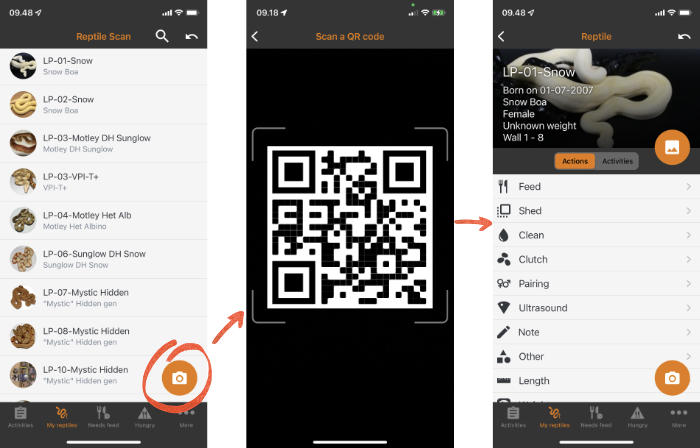
Step 1: Find the reptile
Find the reptile you wish to feed in the Reptiles page and open the details by clicking the info button. In the app you should go to the My reptiles tab, and click the reptile.
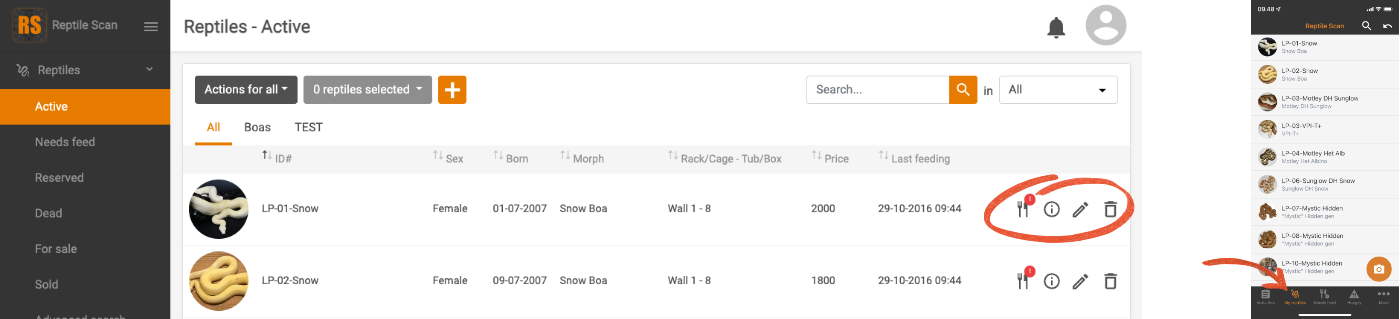
For feeding you can also use the shortcut feeding button next to the info button, or scan a QR code. You can read more about this in other guides on this page.
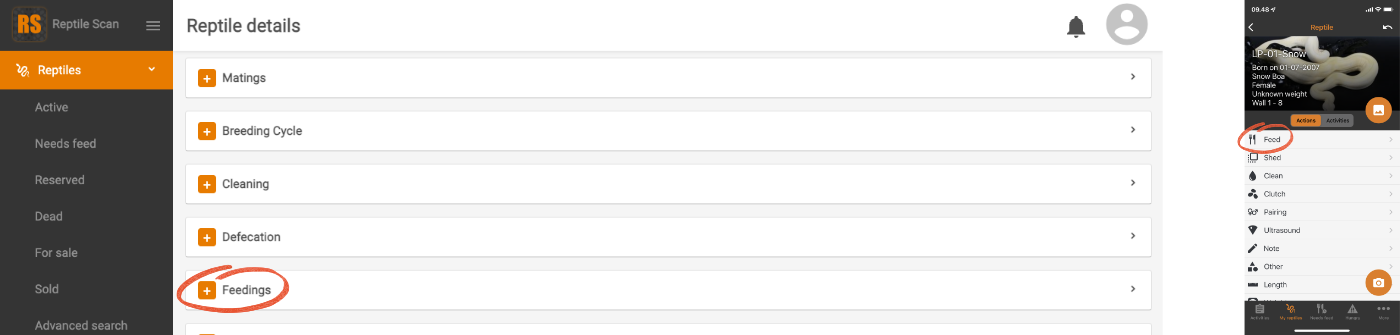
Step 2: Create a new action
The core concept of Reptile Scan is creating actions for the reptiles. Examples of actions are feeding and cleaning. There are many more, and with a profesional subscription you can even create your own.
To create a feeding action in the web console, find the feeding section and click the button. In the app, simply choose Feed in the list.
Step 3: Provide action details
Choose the type, size and amount of feed you are using. Optionally add a note.
Should the reptile refuse to eat the feed, you can edit the action and change the type to Refused feed.
Reptile Scan can keep track of when it is time to feed a reptile. All it requires is that you define the interval between feedings.
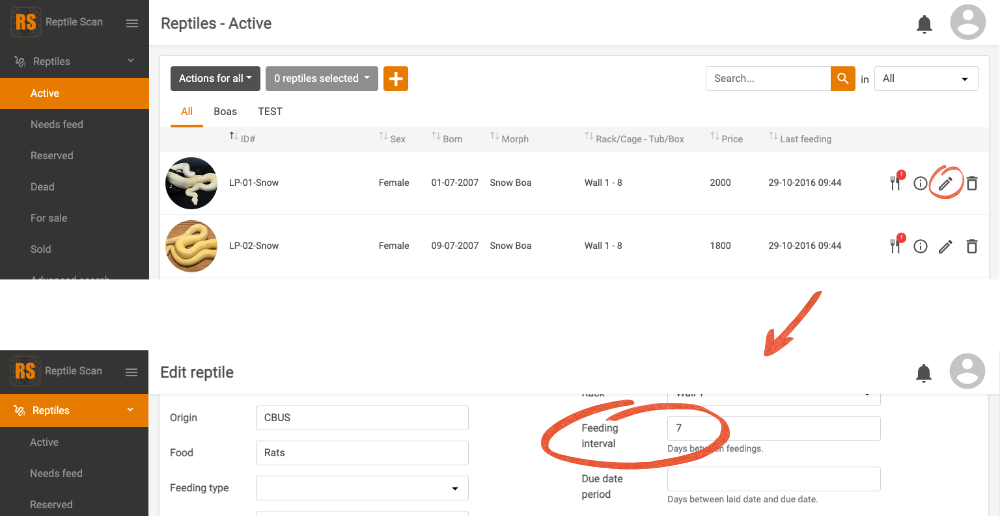
Step 1: Define the interval
Edit your reptile and find the input field called Feeding interval. Type in an integer value for the number of days between feedings.
Step 2: Know when to feed
When looking at the list of reptiles, look at the feed button for the reptile. If it is marked by a red exclamation mark, the feeding interval has been exceeded, and it is time to feed again.

Tip: Use the Needs feed list
Instead of looking in the Active list, where all reptiles are shown, try the Needs feed list. This sorts the reptiles so the ones that need feed the most are first.
Scanning QR codes with the app is a quick and easy way to register actions for your reptiles.
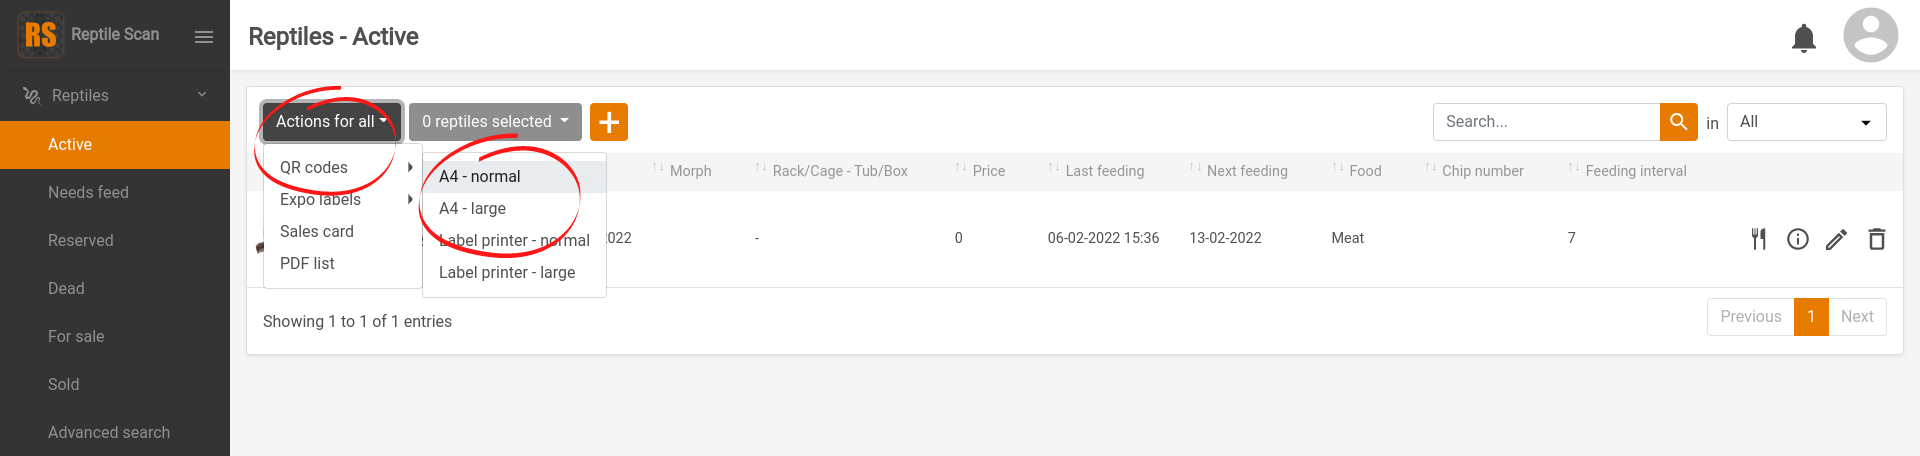
Step 1: Select Reptiles
The first step is to select the reptiles you want to create QR codes for. Click on each of the reptiles in the list to select them.
If you want to generate QR codes for all your reptiles, you do not need to select them. Just continue to the next step.
Step 2: Create QR codes
At the top of the reptile list, you have two dropdown buttons. If you want to generate QR codes for all your reptiles, click the one named Actions for all. Otherwise click the one next to it.
In the dropdown menu, select the QR Codes option. This will display various printing options, where you must choose the format that matches your printer and paper:
- A4 normal / A4 large
- Label printer normal / Label printer large
Step 3: Print
Print you QR codes and stick them on the tubs, cages or wherever makes sense to you, so you are sure the QR codes match the right reptiles.
Step 4: Scan using the app
Most pages in the app have a scan button in the lower right corner. Click this to open the camera scanner, and scan a QR code. This will open the detail page for the reptile, giving easy access to the actions.
Tip: Racks have QR codes too
You can also create a QR code for an entire rack, tub or whatever grouping you wish. Scanning such a code will allow you to feed or clean multiple reptiles at once.
Step 1: Add a clutch
Navigate to the New clutch page by clicking on the button which can be found on the Clutches page (Select submenu "Before hatch date").

The input fields are explained below:
- #ID
- The identifier or name of the clutch.
- Clutch type
- The type of clutch. Eggs or slugs for egg-laying reptiles, live or still born for reptiles giving birth to live young.
- Laid date
- The date the eggs were laid. Clicking will prompt an interactive calendar.
- Due date
- The date the eggs are expected to hatch. If left blank it will automatically be filled using the period of days defined in the "Clutches"-section of the settings menu.
- Hatch date
- The date the eggs hatched. Clicking will prompt an interactive calendar.
- Birth date
- The date of birth, if the mother carries live young.
- Count
- The sum of either eggs or live offspring.
- Good egg count
- The number of healthy eggs.
- Bad egg count
- The number of dead or unfertilized eggs.
- Mother name
- A dropdown for selecting the mother.
- Mother name
- Type in the name of the mother manually, if she is not in the database.
- Father name 1
- A dropdown for selecting the father.
- Father name 2-4
- This is for filling in additional fathers, should there be doubt.
- Father name
- Type in the name of the father manually, if he is not in the database.
- Note
- A note field for typing in any information you find relevant.
Step 2: Manage your new clutch
After having created your clutch, you will automatically be navigated to the detail page for the clutch.
This page consists of the following sections:
- General information about the clutch
- Actions
General information about the clutch
General information about the clutch supplied while creating the clutch.
The due date is calculated using the due date period set for the reptile through the "Edit reptile"-menu, or if blank here, through the settings menu. Alternatively you can set it manually through the "Edit clutch"-menu.
Actions
The "Actions"-section contains several features to manage your clutch. The features are detailed below:
- Edit
- Opens the edit clutch page.
- Label
- This creates a PDF file containing a label with a QR code and general information for the clutch. The information fields on the label can be edited in Settings.
Step 3: Hatch the clutch
Once the clutch has hatched, you can convet it into reptiles in Reptile Scan. Locate the clutch in the list, and click the egg button in the right side. This will open a new page where you can fill in information about the new reptiles.
As a minimum, you must define an ID# in the first field, and how many reptiles to create in the last fields. The ID# will be prefixed with a number when generating the reptiles.

Through the Racks/Cages page you can add your cages and racks to your database. Afterwards you can add your reptiles to the racks or cages, enabling bulk registrations, meaning you can register actions for all reptiles in the cage or rack in one action.
Step 1: Adding rack/cage
To begin adding a rack to your database click the button.
The input fields are explained below:
- Brand
- This dropdown menu contains racks and cages typically used by our users.
- #ID
- Type in a descriptive name for the rack. A unique ID is not required, but recommended.
- Type
- The type of rack or cage is typed in here, such as Herptek or LP Racks "LP3"
- Size
- The size of the rack or cage, for example HTB060 or V35 or just the dimensions of the rack or cage.
- Tub/Box count
- The number of tubs or boxes in the rack.
Step 2: QR Codes
This feature creates a PDF file containing labels for your racks. The PDF files contain labels for all your racks. If you want only a single label, open the detail view for the rack, and find the label button in the menu.
Each label has a QR code and general information about the rack. The information can be edited as explained in Managing your racks.
The QR codes are used for simple registration of actions for all reptiles in the rack. Scan a rack QR code using the app to simultaneously create registrations for all (or some) of the reptiles in the rack.
Step 3: Managing your racks
Your racks are listed on the Racks/Cages page. There are options to show, edit and delete for each individual rack or cage.
Manage your account
The account options can be found in the top right corner of the web console by clicking on the profile image.
There are the following options for account:
- Edit account
- Settings
- Teams Pro feature
- Logout
1. Edit account
The Edit account page is used to edit your account information, including email, password and time zone. Here you can see your current subscription plan, and change to a different plan.
2. Settings
The Settings page is used to set a variety of settings, such as date format, information on the Reptile list, automatically generated IDs, available actions when registering activities, and much more.
2.1 Date and currency format
Used for switching between typically used currency and date formats. The currency format is used on the Reptile Scan Market, while the date format is applied to all dates on the websites and the app.
- Currency format
- There are a wide array of currencies to choose from. Choose your preferred currency, and click update.
- Date format
-
There are 2 date formats to choose from:
- dd-mm-yy (Day, month and year)
- mm/dd/yy (Month, day and year)
2.2 Actions
Using the actions menu, you can limit or add to the options you have when registering actions, both on the website and in the app.
2.2.1 Add new actions Pro feature
Create your own actions:
- Action name
- Name of the action
- Category
- Where the action should be stored
When you have select the Category press "Add Action" and your new Action has been created. It can now be found in the list of Actions - and next time you open the app you will also find it there.
2.2.2 Feeding weights
The feeding weights are used in feeding reports. Feeding reports keep track of your food usage, in number and weight. To get correct weight data for the reports, you need to define the weight relevant to the size of the food, chosen when registering a feed.
You have 10 sizes at your disposal; S, M, L, XL, Pinkie, Crawler, Fuzzy, Weaned, Pup and Jumbo.
You can use whichever weight unit you prefer; such as kilograms, grams, ounces and pounds. As long as you are consistent in use of the unit.
Simply fill in an appropriate weight for each size and click update at the bottom of the page.
2.2.3 Actions
Reptile Scan comes with a variety of registration actions. Naturally not all these actions fit your needs, therefore you can deactive and reactivate actions to suit your needs.
The actions are divided into categories, which relate to the menus in the app.
You simply untick the unwanted actions, and click update. The action will no longer appear when registering an action, in the app or the web console.
You will also find a next to the actions and categories. This feature will delete all registrations, for all reptiles, related to this action or category. This can not be undone!
2.3 Reptiles
This feature can automatically generate IDs for reptile when adding them to the database through the website.
To activate this feature, tick the Assign ID# automatically box and type in an ID# prefix.
From then on, any reptile you add without filling in the "ID"-field will automatically be given an ID corresponding to the prefix you entered, along with a running number starting at 1 and increasing for each subsequent reptile.
2.4 Lists
To make the Reptile list more manageable, it is divided into several pages when you exceed a set number of reptiles. You can set the max number of reptiles you want per page to either 25, 50, 100 or 200.
Here you can also choose what columns are shown in the reptile table. Pro feature
You can also control what column will be used for sorting the list by default. This column will always be used for sorting in the app, but can be changed on-demand in the Reptile list by clicking the column you wish to sort by.
2.5 Logo
You can upload your personal logo through this menu. The logo will be shown in the upper right corner of your Sales cards, as well as the upper right corner of the web console.
2.6 Sales Card
Besides the logo above, you can also add your contact details to your Sales cards, the fields available are listed below. Type in your contact details and click the update button, and your details will now automatically be filled in on your Sales cards.
- First name
- Last name
- Company
- Phone
- Address
- Note
The email address that automatically appears on the sales cards is your account email address.
2.7 QR codes Pro feature
Select fields to be printed on reptile labels and adjust font sizes.
Clutches Pro feature
Select fields to be printed on clutch labels.
Here you can also set a default due date period for your new clutches.
Categories Pro feature
Create reptile categories like Boas or Ball Pythons, and define default due date periods for them. You can then assign a category to a reptile on the reptile edit page.
2.8 Market
Simultaneously publish or unpublish all "for sale" reptiles on Reptile Scan Market.
This is also where you define your seller information for the market.
2.9 Sorting groups Pro feature
If you need to sort your reptiles in a way that does not match any of the columns, sorting groups are the way to customize sorting. Create whatever sorting groups you wish and include the sorting groups column in the reptile list. Then you can select reptiles in the reptiles list and add them to the relevant sorting group using the action dropdown.
3. Teams Pro feature
Manage your team settings (see the Teams section in this guide).
4. Logout
Clicking this logs you out of your account and returns you to the Log in page.
Managing feed inventory
Through the Settings page, under "Feed inventory" you can enable and configure feed inventory management.
For each type of feed, you must supply two values:
- Inventory: The amount available in your inventory.
- Threshold: When feeding while the inventory is below this threshold, a warning will be shown.
Feeding
When feed inventory management is enabled, you will see the inventory amount whenever you select the feed for a feeding registration. If the amount is below the given threshold, it will be marked with a warning.
The purpose of feed inventory management is to remind you to restock you inventory when it gets low. The system will not prevent you from registering feedings, even though your inventory is listed as empty.
General use
Open the Import/Export page in the console and select the type you want to batch create. Download the template file and open it in Excel or a similar spreadsheet application. For each registration you want, fill in a row with data in the columns you need.
Save the file and upload it using the form on the Import/Export page. If you have trouble getting the system to accept the file, please make sure that the .csv file is exported using semicolon as the separator.
The "Reptile id" column decides which reptile an activity is linked to.
"Reptile id" can be found on the information page for a reptile.

Dates
The date will default to the current date if left empty.
To fill out a specific date please use the following date format.
yyyy-mm-dd hh:mm (e.g. 2021-05-25 09:27)
The hours and minutes (hh:mm) can be omitted if you only need the date.
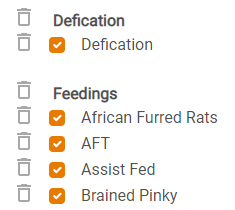
Events cover multiple types of activities. These include feeding, cleaning, breeding cycle, defication, medication, shed, and ultrasound.
To specify the type of event to register, please fill in the Category and Type columns.
Categories and types are defined in the actions tab in settings. Lines in bold are categories, and the regular lines under these, are the types associated with the category. Both columns are required.
Note is used as a comment on a certain activity.
Size is only relevant for the Feedings and Ultrasound categories. For feedings it is used to describe the size of food. For ultrasound the size will refer to follicle size.
The only acceptable inputs for a feeding size are: Pinkie, Crawler, Fuzzie, Weaned, Pup, Jumbo, S, M, L, XL or leaving it empty.
Count is only relevant for the Feedings and Ultrasound categories. When filling in Count, please use only numbers - no text.

This row will create an event activity for the reptile with id 281646. The reptile was fed three pieces of extra large brained pinky on May 4th, 2021 at 10 am.
Category is the type of note you're making. The only acceptable categories at the moment are Medical, Standard and Follow up. It can also be left blank if no category is needed.
Content is the note itself.
Note example:

This row will create a note activity for the reptile with id 281646. At the time of importing, a medical note was made regarding a regular checkup of the reptile.
Lengths is the measured length. Please fill in the length using only numbers, without specifying the unit.
Length example:

This row will create a length activity for the reptile with id 281646. On May 4th 2021, the reptile was measured to be 240 (preferred units) long.
Weight is the measured Weight. Please fill in the weight using only numbers, without specifying the unit.
Weight example:
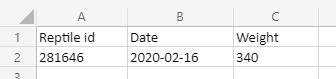
This row will create a weight activity for the reptile with id 281646. On February 16th, 2020 the reptile was measured to weigh 340 (preferred units).
Start- and enddate are the beginning and end of a brumation. Please fill in the dates as shown above in the Dates section
Brumation example:
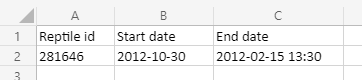
This row will create a brumation activity for the reptile with id 281646. The reptile went into brumation from October 30th, 2012 to February 25th, 2013.
General use
Batch creation for reptiles works differently compared to other registrations. Please read through this guide carefully before trying to batch create reptiles.
Download the template file and open it in Excel or a similar program. For each reptile you want to create, fill in a row with data in the columns you need. All columns are optional.
Please only import files based on the templates provided. It is very important that you do not convert the provided template to and from different filetypes.
Most of the columns can be filled out as you see fit. There are however a few fields which need to follow a specific syntax.
For a description of each column please see the Columns section. Please keep in mind that these columns are only a subset of the available fields for a reptile. Much more can be filled in by creating a new reptile.
Checkbox columns
Some columns corrospond to checkbox fields that can either be checked or not. Please use the value true if the checkbox should be set, and false otherwise. For example, filling in true in the venomous column will mark the reptile as venomous.
Dates
To fill out a specific date please use the following date format.
yyyy-mm-dd hh:mm (e.g. 2021-05-25 09:27)
The hours and minutes (hh:mm) can be omitted if you only need the date.
Numerical columns
For all numerical columns, please only insert numbers without the unit, so if a reptile is weighs 1200 grams, don't write "1200 g". Just write "1200".
Columns (all are optional)
- born
- The date the reptile was "born".
- breeder
- The name of the breeder.
- breeder_email
- The email of the breeder.
- cbwc
- Determines whether a reptile is wild caught or captive bred. Please enter either "WC" or "CB".
- chip_number
- The chip number of the reptile.
- common_name
- Common name of the type of reptile.
- dead
- Is the reptile dead? true/false answer.
- father_text
- Name of the father. Can be specified further through the edit page.
- feeding_interval
- The interval between feedings in days.
- food
- The food the reptile is being fed.
- for_sale
- Should the reptile be for sale? true/false answer.
- habitat
- The usual habitat for the reptile.
- license_number
- The license number for the reptile.
- morph
- The morph of the reptile
- mother_text
- The name of the reptile's mother. Can be specified further through the edit page.
- name
- The identifier or name of the reptile.
- nickname
- The nickname of the reptile.
- note
- A note connected to the reptile.
- origin
- The origin of the reptile.
- price
- The price of the reptile. The currency of this value is set in your settings.
- reserved
- Is the reptile reserved? true/false answer.
- scientific_name
- The scientific name of the reptile.
- sex
- The sex of the reptile. Valid values are Male, Female or Unknown.
- size
- The length of the reptile.
- sold
- Has the reptile been sold? true/false answer.
- species_name
- The name of the species.
- species_number
- The species number.
- tub
- The tub number.
- venomous
- Is the reptile venomous? true/false answer.
- weight
- The weight of the reptile.
Example
Part one:

Part two:

Teams
Through the Teams page you can create teams and invite other Reptile Scan Pro users.
When in a team you receive full access (update, remove, etc.) to all reptiles of all users in the team.
Create a new team
Click the button, type in the team name and click "Create".
Invite team member
Open the detail view of a team and click the button. Type the email address of the user you wish to invite. Please note that it must be the email address that is registered in Reptile Scan, and the user must have a Pro subscription.
An invitation is emailed to the user, and until the invitation is accepted, the user will be listed as "pending" in the team list. Once the user accepts the invitation, their status will change to "Active".